In this article I would like to tell how to implement application which displays 3d analogue clock. We are not going to use 3d models or textures, instead we will use math and Irrlicht' embedded methods for creating geometry of parts of our clock.
So lets start!
First we initialize the device, set window title and add rendering loop. Nothing fancy, just an ordinary minimum Irrlicht Lime application:
IrrlichtDevice device = IrrlichtDevice.CreateDevice(DriverType.Direct3D9);
device.SetWindowCaption("Analogue Clock - Irrlicht Lime");
while (device.Run())
{
device.VideoDriver.BeginScene();
device.SceneManager.DrawAll();
device.VideoDriver.EndScene();
}
device.Drop();
This is going to be out base application (its already working, but does nothing special). Now its time to discuss more details about our clock. There are couple of ways to implement them, here some most obvious of them:
We will take approach #3, but the 2nd one is also is not bad at all for this particular case.
To create new node type we have to create an ordinary class and derive it from SceneNode. Here I would like to divert a bit and discuss one issue. In general, there are two ways to allow our class-user to create instance of our node. The reason why this issue is dignified a discussion at all is that SceneNode is derived from ReferenceCounted class. What does it mean? Well, it means that if we create an object using new or want to hold a reference to an object by Grab(), we have to call Drop() after all. If we make our constructor to be public, than creation of our clock node will look like:
ClockNode node = new ClockNode(device.SceneManager.RootNode, device.SceneManager);
node.Drop();
That is the correct way, because the constructor will handle the node by adding it to the Irrlicht' scene node manager, which will Grab() the reference for his needs. We have to call Drop() since we called new and we don't need a reference any more. The bad thing is that the Drop() call above is very easy to forget, and that is why I honestly dislike this approach. So how to avoid this? The solution is to hide the constructor – it shouldn't be public, but expose a static member for creating instances of our node (Irrlicht itself has very similar approach – we cannot create MeshSceneNode by calling new, we have to call the “add” method, the only thing it is located not inside MeshSceneNode, but we call AddMeshSceneNode() of the SceneManager, which handle the creation and we don't need to call Drop() after it).
So our public static method of adding new clock node will look like:
public static ClockNode AddClockNode(SceneNode parent)
{
ClockNode n = new ClockNode(parent, parent.SceneManager);
n.Drop();
return n;
}
If you would ever need to write a “create” method, all you need is to do all the same as in “add” method except Drop() call. As you see I will not check if parent argument is null because I do not want to stretch the source code. But in general, its good practice to check all you can especially in code which is not critical to execution speed.
Now lets look into the constructor (because we call it above, but still didn't implemented). Minimal working constructor of the class which derived from SceneNode will be:
ClockNode(SceneNode parent, SceneManager smgr)
: base(parent, smgr)
{
}
Our class compiles now well, but still do nothing. Lets add some more code into it!
Any custom node should correctly report about its bounding box and materials it uses. For example, if we use SceneManager.AddMeshSceneNode(), we receive correct values of MaterialCount and BoundingBox.
Our clock will consist of many parts, but most of them will be statically placed and we will never need a pointer on them. We are going to hold only pointers on the parts that we will need to update – the arrows. So our class will need only next variables:
AABBox boundingBox;
List<Material> materialList = new List<Material>();
private MeshSceneNode arrowSeconds;
private MeshSceneNode arrowMinutes;
private MeshSceneNode arrowHours;
Now we will write the constructor. I plan to add into it all the code related to generating and creating clock parts. The first lines of constructor will be the lines which kind of required because no one scene node can live without them – event handling. These events of SceneNode has protected modifier, so they visible only for derived classes only:
OnGetBoundingBox += new GetBoundingBoxEventHandler(ClockNode_OnGetBoundingBox);
OnGetMaterialCount += new GetMaterialCountEventHandler(ClockNode_OnGetMaterialCount);
OnGetMaterial += new GetMaterialEventHandler(ClockNode_OnGetMaterial);
OnRegisterSceneNode += new RegisterSceneNodeEventHandler(ClockNode_OnRegisterSceneNode);
OnRender += new RenderEventHandler(ClockNode_OnRender);
Lets look into each event in detail:
In most cases each custom node require all events listed above to be handled. In case when your node is completely static – you don't need to handle two last events.
Now the code for all our events. It is fairly simple and will fit a lot of cases (other custom nodes):
AABBox ClockNode_OnGetBoundingBox()
{
return boundingBox;
}
int ClockNode_OnGetMaterialCount()
{
return materialList.Count;
}
Material ClockNode_OnGetMaterial(int index)
{
return materialList[index];
}
void ClockNode_OnRegisterSceneNode()
{
if (Visible)
SceneManager.RegisterNodeForRendering(this);
}
void ClockNode_OnRender()
{
// empty
}
The body of ClockNode_OnRender() I intentionally left empty for now, in future we are going to write there the code for animating our arrows.
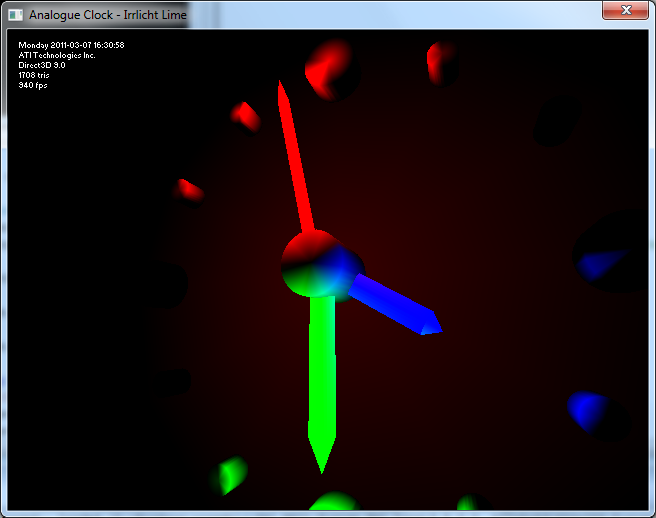
At last, it is time to construct our clock. It will consist of clock face, axis for arrows at the center of clock face (we don't want the arrows to intersect each other, so we will place them at different height), clock ticks along the edge of the clock face (12 ticks, each 3rd going to be a bit larger) and 3 arrows – hour, minute and second arrows. Clock face is going to be faced to opposite side of Z axis (like this clock is hanging on the clock tower), this means than arrows is going to rotate in XY plane.
Also I plan to add some lighting effects: clock arrows will glow with neon light, second – red, minute – green and hour – blue.
Lets add gray clock face:
Mesh mesh = SceneManager.GeometryCreator.CreateCylinderMesh(100, 32, 6, new Color(180, 180, 180));
MeshSceneNode clockFace = SceneManager.AddMeshSceneNode(mesh, this);
clockFace.Rotation = new Vector3Df(90, 0, 0);
clockFace.Position = new Vector3Df(0, 0, 10);
mesh.Drop();
Now we need don't forget about our materialList and boundingBox values, and update them. As this is our first part of the model, we are going simply to set the value, but next time we will increase existing value by AABBox.AddInternalBox(). With materials even easier – we simply add all the materials to our collection.
clockFace.UpdateAbsolutePosition();
boundingBox = clockFace.BoundingBoxTransformed;
for (int i = 0; i < clockFace.MaterialCount; i++)
materialList.Add(clockFace.GetMaterial(i));
We have to call UpdateAbsolutePosition() because we are going to use BoundingBoxTransformed (not just BoundingBox). Now doing same for central axis for the arrows:
mesh = SceneManager.GeometryCreator.CreateCylinderMesh(10, 24, 16, new Color(255, 255, 255), false);
MeshSceneNode clockCenter = SceneManager.AddMeshSceneNode(mesh, this);
clockCenter.Rotation = new Vector3Df(90, 0, 0);
clockCenter.Position = new Vector3Df(0, 0, -14);
mesh.Drop();
clockCenter.UpdateAbsolutePosition();
boundingBox.AddInternalBox(clockCenter.BoundingBoxTransformed);
for (int i = 0; i < clockCenter.MaterialCount; i++)
materialList.Add(clockCenter.GetMaterial(i));
Next, we add clock ticks. We use sine and cosine functions to calculate positions on the edge of the clock face:
for (int j = 0; j < 12; j++)
{
mesh = SceneManager.GeometryCreator.CreateCylinderMesh(5, 10, 16, new Color(255, 255, 255), false);
MeshSceneNode clockTick = SceneManager.AddMeshSceneNode(mesh, this);
clockTick.Rotation = new Vector3Df(90, 0, 0);
float s = (float)Math.Sin((j * (360 / 12)) / (180 / Math.PI));
float c = (float)Math.Cos((j * (360 / 12)) / (180 / Math.PI));
clockTick.Position = new Vector3Df(s * 80, c * 80, 0);
if ((j % 3) == 0)
clockTick.Scale = new Vector3Df(2, 1, 2);
mesh.Drop();
clockTick.UpdateAbsolutePosition();
boundingBox.AddInternalBox(clockTick.BoundingBoxTransformed);
for (int i = 0; i < clockTick.MaterialCount; i++)
materialList.Add(clockTick.GetMaterial(i));
}
It is time to add arrows. Each arrow will have own color, hour arrow is blue, but the pure blue we will be used only for EmissiveColor, for DiffuseColor we will add a bit of red and green to the color so it will be “new Color(40, 40, 255)”. Why do we need this “40”? Because, without these “40” we will not see affecting all other colors, if this what we need – we can remove that “40”, but the result is going to be the same as we would just turn off the lighting for the node like “node.SetMaterialFlag(MaterialFlag.Lighting, false)”. The difference is shown below:
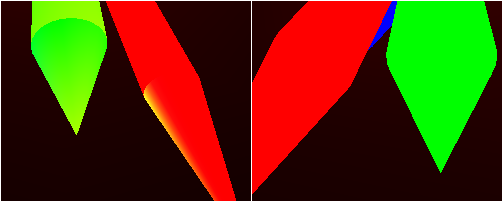
We see that when red and green colors get mixed, they give yellow (visible on the edges of the arrows at left, and no effect at right).
// adding hour arrow
mesh = SceneManager.GeometryCreator.CreateArrowMesh(12, 12, 40, 35, 4, 4, new Color(40, 40, 255), new Color(40, 40, 255));
arrowHours = SceneManager.AddMeshSceneNode(mesh, this);
arrowHours.GetMaterial(0).EmissiveColor = new Color(0, 0, 255);
arrowHours.GetMaterial(1).EmissiveColor = new Color(0, 0, 255);
arrowHours.Position = new Vector3Df(0, 0, 3);
mesh.Drop();
arrowHours.UpdateAbsolutePosition();
boundingBox.AddInternalBox(arrowHours.BoundingBoxTransformed);
for (int i = 0; i < arrowHours.MaterialCount; i++)
materialList.Add(arrowHours.GetMaterial(i));
// adding minute arrow
mesh = SceneManager.GeometryCreator.CreateArrowMesh(12, 12, 60, 50, 4, 4, new Color(40, 255, 40), new Color(40, 255, 40));
arrowMinutes = SceneManager.AddMeshSceneNode(mesh, this);
arrowMinutes.GetMaterial(0).EmissiveColor = new Color(0, 255, 0);
arrowMinutes.GetMaterial(1).EmissiveColor = new Color(0, 255, 0);
arrowMinutes.Position = new Vector3Df(0, 0, -5);
mesh.Drop();
arrowMinutes.UpdateAbsolutePosition();
boundingBox.AddInternalBox(arrowMinutes.BoundingBoxTransformed);
for (int i = 0; i < arrowMinutes.MaterialCount; i++)
materialList.Add(arrowMinutes.GetMaterial(i));
// adding second arrow
mesh = SceneManager.GeometryCreator.CreateArrowMesh(12, 12, 70, 60, 2, 2, new Color(255, 40, 40), new Color(255, 40, 40));
arrowSeconds = SceneManager.AddMeshSceneNode(mesh, this);
arrowSeconds.GetMaterial(0).EmissiveColor = new Color(255, 0, 0);
arrowSeconds.GetMaterial(1).EmissiveColor = new Color(255, 0, 0);
arrowSeconds.Position = new Vector3Df(0, 0, -11);
mesh.Drop();
arrowSeconds.UpdateAbsolutePosition();
boundingBox.AddInternalBox(arrowSeconds.BoundingBoxTransformed);
for (int i = 0; i < arrowSeconds.MaterialCount; i++)
materialList.Add(arrowSeconds.GetMaterial(i));
I use GetMaterial() with indices 0 and 1, because I know that arrow created by GeomertyCreator consists of two mesh buffers (cylinder and cone) and that is why has two materials (you can check MaterialCount property of the arrow node).
Now we have all parts of our clock model and the values of boundingBox and meterialList are correct. Lets add light nodes: each one will be a child node of proper arrow – this will free us from synchronizing them with each arrow position.
SceneManager.AddLightSceneNode(arrowSeconds, new Vector3Df(0, 70, 0), new Colorf(arrowSeconds.GetMaterial(0).EmissiveColor), 80);
SceneManager.AddLightSceneNode(arrowMinutes, new Vector3Df(0, 60, 0), new Colorf(arrowMinutes.GetMaterial(0).EmissiveColor), 60);
SceneManager.AddLightSceneNode(arrowHours, new Vector3Df(0, 40, 0), new Colorf(arrowHours.GetMaterial(0).EmissiveColor), 40);
The constructor is finished. If you run the code now, we will see the clock, but they all the time will show 12 o'clock sharp. Animation is what is left to do. As I said long time above, we will add the code into ClockNode_OnRender():
void ClockNode_OnRender()
{
DateTime time = DateTime.Now;
arrowSeconds.Rotation = new Vector3Df(0, 0, -time.Second * (360 / 60));
arrowMinutes.Rotation = new Vector3Df(0, 0, -time.Minute * (360 / 60));
arrowHours.Rotation = new Vector3Df(0, 0, -(time.Hour % 12) * (360 / 12));
}
Instead of .NET Framework' DateTime we could use Irrlicht' Timer.RealTimeAndDate, but if you plan to extend code a bit by adding smooth movement to the arrows, you will lack of Milliseconds, which DateTime already has.
Clock node is completed and ready. To use it all you need is to call our provided static method:
ClockNode.AddClockNode(device.SceneManager.RootNode);
Lets add FPS camera for easy navigation in scene:
CameraSceneNode camera = device.SceneManager.AddCameraSceneNodeFPS(null, 100, 0.1f);
camera.Position = new Vector3Df(40, -20, -100);
camera.Target = new Vector3Df();
We have to update Target after changing Position because when we change position, we also change its target – its parallel offset. Also we add some statistics to display, it will go right after DrawAll() of the scene manager:
string s = string.Format(
"{0}\n{1}\n{2}\n{3} tris\n{4} fps",
device.Timer.RealTimeAndDate,
device.VideoDriver.VendorInfo,
device.VideoDriver.Name,
device.VideoDriver.PrimitiveCountDrawn,
device.VideoDriver.FPS);
device.GUIEnvironment.BuiltInFont.Draw(s, 11, 11, new Color(0, 0, 0));
device.GUIEnvironment.BuiltInFont.Draw(s, 10, 10, new Color(255, 255, 255));
That is it!
The source code for this article is an example L06.AnalogueClock of the Irrlicht Lime SDK.